
I am often asked how I create my designs for my gallery collections. So here is the first blog on this topic.
The copper components I use primarily for earrings are lots of fun to create. This particular style begins as a square piece of copper.
First step is to hammer (or forge) the design on the squares. You can see the design clearly in the image here.
Next step is to punch out or saw out the center pieces. This also serves to create a separate square component that can be used as an accent piece in some designs.
The 3rd step in this initial process is to add my signature to the back of each component. I had a custom die created so this can be done now with one swing of a hammer. The copper piece at the top of the image shows this signature.
At this point I normally add the hole punches to connect the earwires and other components. Sometimes I place them on the corner and also love the center punch design.
And NOW  we get to the FUN part!

My creative juices start to flow and I get to play with a variety of patinas and finishes to create art.
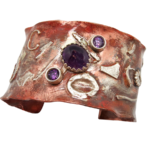
This image shows two of the patinas that I have created. The top one is a vinegar/ammonia patina that brings out the blue/green colors your see here. The bottom design was created by fusing tiny silver components to the copper.
I have also experimented with combining these two processes. It is beautiful! Other finishes are created with heat, peanut oil and flux. The options are endless.
I always apply a treatment to coat the pieces when finished. This prevents the patina from changing by essentially not allowing the copper to oxidize any further.


Leave a Reply